

Ever found yourself working on a site where someone has made modifications directly to a third-party theme that now has updates? It doesn’t take long in the WordPress business to start running into these. It makes updating really time-consuming.
A lot of people will just punt on the updates and manage with their forked theme. But this creates problems when functions are deprecated, WooCommerce templates change, and other things move along that would normally be handled by the original theme author. Now those updates are your problems. Ew.
Better plan: rip your customizations out of the parent theme and put them into a proper child theme. It’s a little time-consuming, but here’s how to do it.
For best results with this tutorial, you should know: Writing a little bit of code and either getting around phpMyAdmin or using WP-CLI. Unless you’re a masochist or you haven’t made many code changes to the parent theme, you’ll probably want to know Git
When Not to Bother
Before going down this path, make sure your theme is even actively supported. If it isn’t, updates to the theme, when needed, are now your responsibility (or switch themes).
If your theme author has their own website to manage licensing (like Beaver Builder or Divi), check there for information about update and support policies and timeframes.
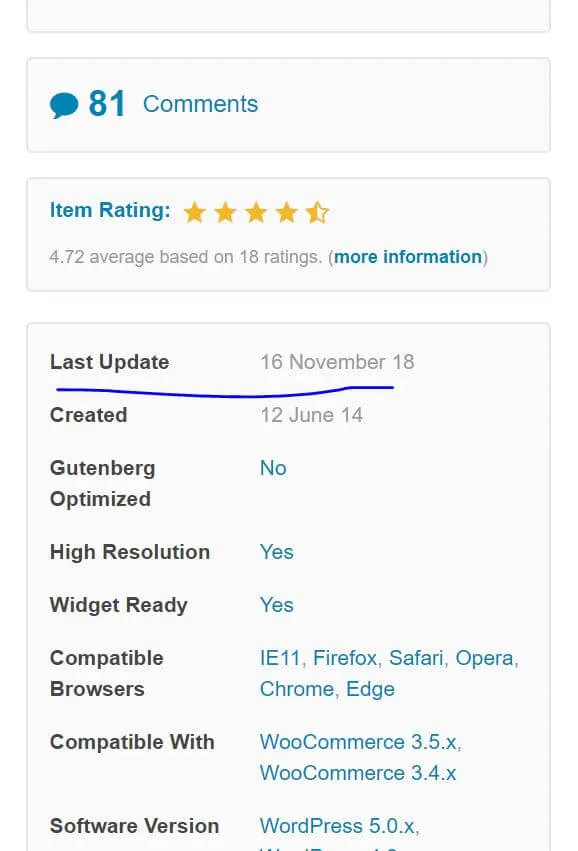
For ThemeForest themes, the last updated date is published. Check for a date in the last six months or so.
If neither of those work for you, try Googling “[theme name] changelog” and see if anything comes up. A changelog is a document of updates to a piece of software. If the theme author keeps one, it should give you the last updated date.
And finally, if all else fails, you can try contacting the theme author to ask directly if they’re still providing support.
Create a Child Theme
This part is easy. Just set up the child theme as if you’d done it in the first place. Basic instructions can be found in the WordPress docs. Some premium themes may have specific instructions, or even child theme starters. Need a Divi child theme? Try this post. Using Beaver Builder? Your license comes with a starter child theme all ready to go!
In my experience, most people who have forked their parent theme are using a random theme they found on ThemeForest. Foregoing my opinions on that, you’ll probably just want to follow the WordPress docs to get going.
Once you’ve got it working, activate the child theme.
Copying Your Theme Modifications
Most theme’s make use of the WordPress customizer to make any number of changes to the theme, from setting logos to customizing colors and fonts. These settings are all saved into the database per theme. As soon as you activate your child theme, you’ll probably notice these settings have all disappeared!
Fear not, we’ll get them back. The settings are saved in the wp_options table of the database. Look for the row where option_name is theme_mods_{parent-theme-slug-here}.
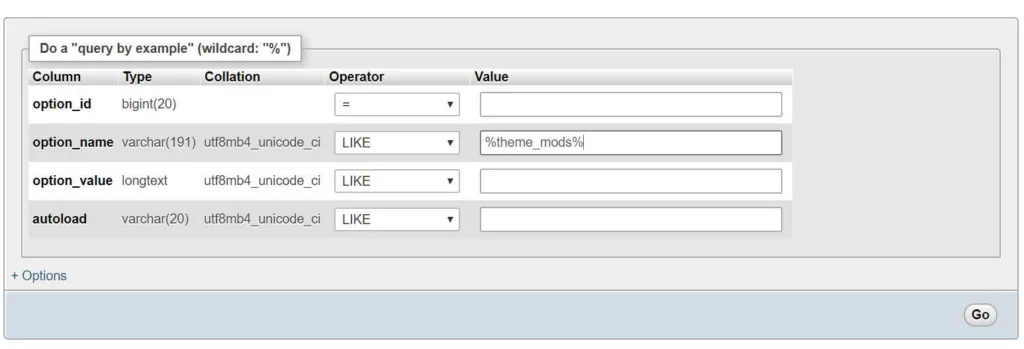
wp_options table is a pretty easy way to find the setting you needThe setting in the option_value column is serialized, but with phpMyAdmin or a similar tool you should be able to copy the whole thing. If you’ve used a variety of themes over the years, make sure you’re copying the right one.

When you activated your child theme, WordPress will have created a row for its settings. Find the row where option_name is theme_mods_{child-theme-slug-here}. Clear out its value and paste in what you copied from the previous row.
Swapping theme_mods with WP-CLI
If you prefer using WP-CLI, you can do this without poking through the database. Try the following two commands:
wp option get theme_mods_{parent-theme-slug-here} --format=json > theme_options.json
wp option update theme_mods_{child-theme-slug-here} --format=json < theme_options.json
rm theme_options.jsonCode language: JavaScript (javascript)
Reapplying Code Changes to the Child Theme
The last thing to do is take all the code changes you made in the parent theme and move them to the child theme.
If you and your theme make good use of hooks and filters, this will be easier. If not, you’ll have to take advantage of child themes’ ability to overwrite parent templates.
Get a Fresh Copy of the Parent Theme
First, check out the parent theme’s version number in the style.css file. See the example below.
/*
Theme Name: My Parent Theme
Theme URI: http://example.org/parent-theme-theme
Description: Theme from Parent Theme Co.
Version: 1.4.9
Author: Parent Theme Co. Inc.
Author URI: http://example.org
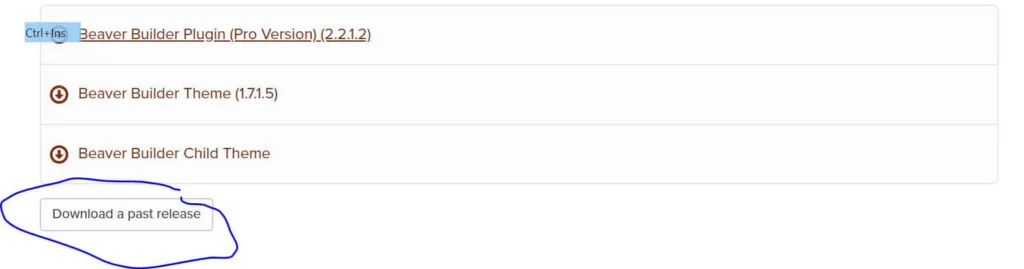
/*Now you need to download a copy of that version of the parent theme. The Beaver Builder team makes this pretty easy:
If your theme came off the WordPress.org theme repository, you can follow the trick documented here. And ThemeForest once again comes up short, so you’ll have to contact the theme author. If you’re having trouble finding a copy, contact the theme author.
Save Your Changes
To see the changes between your forked version of the parent theme and the original, you’ll want to do one of two things:
If you’re familiar with git, commit your forked copy of your theme. Then overwrite it with the original. Git diff should now show you the changes you’ve made and need to recreate in the child theme.
Otherwise, it’s up to you to go file by file and eyeball for changes that need to be copied to the child theme.
Using Your New Child Theme
If there’s a file in your child theme in the same place as the parent theme, it will get preference. For example, if your child theme has header.php, it’ll overwrite the parent’s version. This is a good tool for when you’ve made a lot of changes to a file.
The exception to this is your functions.php file and style.css file. These will both be loaded with the parent theme’s copies, so feel free to simply move any styles or functions you added to the parent theme over to the child theme.
If your changes are subtle and the right ones are available, actions and filters are a great way to change things from your child theme without changing the parent theme’s files or overwriting them in your child theme. There’s some basic information on actions and filters in the WordPress docs, but it’s an advanced topic for another day.
Once you’re finished, your site should look like it did before, and your parent theme should now match the clean copy you downloaded. This process may be time-consuming!
Stay Updated!
You’re now safe to update your parent theme to the latest version. This still may cause some conflicts with your child theme, especially when you’ve overwritten parent theme files in your child theme, so you’ll want to update carefully and make any changes necessary.
And that’s a wrap. Other tips and tricks for setting up a child theme after-the-fact? Comment below!
Leave a Reply