

Divi is a powerful WordPress theme and page builder from Elegant Themes that allows folks like me to quickly generate modern and professional designs when a custom job just isn’t justified. It’s one of the most popular theme solutions for WordPress out there and offers a lot of customization options.
Out of the box, Divi allows you to start customizing the typography on your website. These options include a wide selection of Google Fonts, but it by no means provides the whole collection. If you find yourself in need of a Google Font that isn’t already built into Divi, you could write some custom CSS for your theme and queue up the font yourself, sure, but I wanted a way to integrate my desired font options seamlessly into Divi’s options, just like the existing ones. How can we do that?
A heads-up, you’ll need to know how to write (or at least copy, paste and tweak) PHP and CSS for this tutorial. Also, be sure you’re working with a plugin or child theme and not altering Divi itself. Making changes directly to Divi prevents you from upgrading down the road without losing all your customizations.
The page builder
Divi actually allows you to select fonts in two places—the page builder and the theme customizer. We’ll start with the page builder, as it’s the simpler task.
Divi exposes its font options via a pair of filters. The first of these is et_builder_google_fonts. To add your new font selections to Divi’s options, you’ll want to take advantage of that somewhere like your functions.php file. Add your new Google font and its associated styles, character sets and type to the existing fonts like so:
function my_theme_google_fonts($fonts) {
  $fonts['Vidaloka'] = [
    'styles' => '400',
    'character_set' => 'latin',
    'type' => 'serif',
  ];
  // sort fonts alphabetically
  ksort($fonts);
  return $fonts;
}

add_filter('et_builder_google_fonts', 'my_theme_google_fonts');
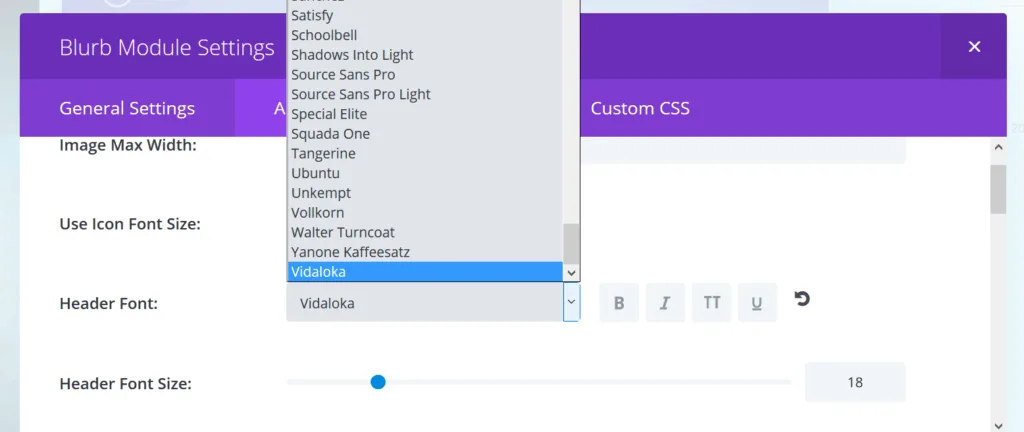
The ksort is optional, but keeps things nice and organized. Now if you go to any page and activate the Divi page builder, you’ll see your new font listed at the end of the previous options (or in alphabetical order if, unlike me, you added the ksort before you took a screenshot).
If you select it and save, it’ll show up on the front end exactly like any of the other options. Awesome!
Custom Google Fonts in the Divi theme customizer
Ensuring this next part looks nice is a bit trickier. To first understand the problem, open up the theme customizer and navigate to General Settings → Typography. You’ll notice each font is not just in the list, but also represented in its own typeface rather than the default admin typeface.
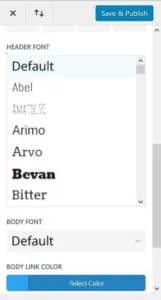
If you have any background in development and network requests, you might immediately be horrified, assuming that each font is being loaded on the page. What’s actually going on is much more tame. The folks at Elegant Themes have created a spritesheet containing an image of each font title in its own typeface. CSS classes are applied to each option in the list to make sure the appropriate image appears with each font choice.
Ignoring this for a moment, you can actually attach the exact same function you wrote earlier to a new hook to add your font to these options:
add_filter('et_google_fonts', 'my_theme_google_fonts');
Easy enough. Open up the customizer, however, and you’ll see instead of your font being represented nicely with all the other options, “Default” now just appears twice. Without a CSS class that the Divi stylesheet recognizes, it falls back to the default sprite.
![]()
To get this to look nice, you’ll need to create your own background image. Take a screenshot of the font name typed out in itself and drop it into a folder in your theme, about 216px x 40px. For a perfect fit, use something like Photoshop and get one with a transparent background. If you’re not already enqueueing a custom stylesheet in the admin, you’ll need to set that up using the admin_enqueue_scripts action, also in something like your functions.php file:
add_action( 'admin_enqueue_scripts', 'my_theme_admin_enqueue_scripts' );

function my_theme_admin_enqueue_scripts() {
  wp_enqueue_style('my-admin-theme', get_stylesheet_directory_uri().'/admin.css');
}
Next, create an admin.css in the root of your theme (or whatever file you may be referencing above). We’ll add just a couple of styles to this to get the one font that’s set up to work.
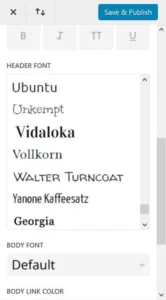
.et_google_font_custom_select span.et_filter_text.et_gf_vidaloka,
.et_google_font_options li.et_gf_vidaloka {
  background-image:url('./img/vidaloka.jpg');
  background-size:contain;
}
To get the name of your CSS class selector, you’ll take the name of your font, lowercase the whole thing, and swap spaces with hyphens. If you aren’t 100% sure, you can use your browser’s inspector to check it out live in the customizer.
If you’re feeling particularly efficient, rather than request a whole stylesheet, you could simply add the styles to the admin head, and even make sure it’s only happening on the theme customizer page. If you know enough to understand why that’s better, I’ll leave you to figure out the code.
Once your CSS is in place, you can go back to the customizer and refresh to see your new font available in the dropdown looking nice and pretty. Unless you’ve been meticulous, it probably won’t match exactly. If you’re feeling particular, you could spend a bit of time to get your background image perfect.
Design superb websites
And that’s it! Go forth with your new-found powers and apply gorgeous typefaces to all the things. Be sure to share with your Divi-loving friends and leave any thoughts in the comments below.
Big thanks to commenter Manuel for a couple tips on cleaning up the final interface.
Leave a Reply to Sidjay Cancel reply